

How To Make An Object Extend In Animation In Blender
Did you know that you could program in Blender to automatically create 3D objects and animations?
Blender is a well-known piece of software for 3D modeling, sculpting, texturing, animation and more than! As the versions kept on coming out, this tool has slowly earned its place in the CGI industry, and so much so that at that place are at present a few long-feature films that are fabricated entirely using Blender and that there are Youtube channels similar Blender Guru entirely dedicated to learning the ins and outs of this soft…
… while information technology is completely free and open-source!
This has introduced a profound change of mindframe in the earth of 3D because information technology showed people that anyone could endeavour and have a go at this grade of art and that it could achieve pretty incredible results.
So, yes – at first, CGI software is primarily aimed at artists. But Blender, just like its competitors, besides has another side for developers: a fashion to program your 3D scenes.
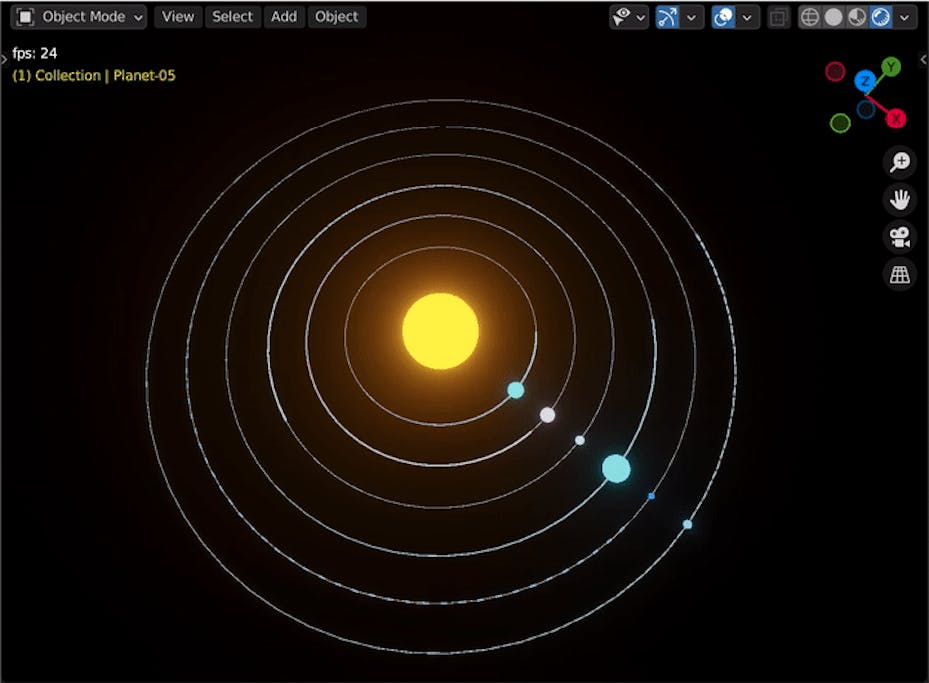
Today, I want to prove how this programmatic approach to Blender allows yous to instantly create a basic solar system like this one:
Are you ready? Then permit's dive in! 🙂 If you lot want to get the code directly,it's available equally a Github gist 🚀
The Blender Python API
Ok, now: how does Blender let us to "plan a scene"? Via itsPython API.
Y'all might be wondering why it's interesting to have a Python API for a 3D soft. I mean: whyembed a creative tool with stuff for coders?
There are, in truth, lots of use cases where it can exist useful toautomate a task: whether you want to chop-chop randomise your scene population algorithm, count objects and get custom stats on your scene or even create an entire world from scratch that can be reproduced accurately with seeds… having a way to integrateprocedural generation or tailor-made tools directly into a CG context is simply an amazing opportunity!
Moreover, the fact that information technology's inPython, a language famous for beingeasy-to-larn and for which in that location is merely ancountless number of tutorials on the cyberspace, makes information technology neat for beginners to dive in (without the fear of onetime C/C++-based APIs that required, in my stance, college coding skills…).
By the way: this Python API is not simply a shiny toy for wannabe-devs: it's reallyoffice of the Blender soft itself and it'due southused internally by the programme as a cadre tool, although the user inputs and the results arewrapped in a user-friendly UI 😉
The API in itself, bpy (for "Blender Python"), can be browsed on Blender's specific docs; it is subdivided in several submodules, the 3 nearly of import / commonly used being:
- bpy.context: it contains getters and readers on read-only values that depict your current working context or even the area (i.e. the console in your window) that is currently beingness accessed
- bpy.information: it gives y'all access to the resource in your scene (the objects, the materials, the meshes…) and then you tin load, add together or delete them
- bpy.ops: that's the real meat of the API – it's what allows you to perform actions and call operators on your objects or your views; information technology's basically how you lot tin can simulate user deportment via scripting (like selecting an object, entering edit mode, applying subdivisions, changing to "flat" shading, maximising a window…)
Today, we'll focus on generating objects thanks to this API, so we'll be doing someprocedural generation. I've already discussed the benefits of this approach in other articles; roughly put, procedural generation is about defininga ready of rules anda machine that uses those rules toautomatically create valid instances. The large advantage is that, one time you're washed making the engine, yous can create as many instances every bit y'all want! Moreover, this generation can be pretty quick, dynamic depending on given conditions and infinite (for example for never-ending games like runners). But, of class, information technology's usually a bit harder than hand-design because you lot need to teach your software the right and wrong patterns (i.east., the "rules").
Procedural generation is a very vast and complex topic. There are plenty of tools for generation engines – and to be honest, a large amount relies onrandomness. The idea is to starting time off with random values and so somehow "control the craziness" so it is valid.
Spawning and animating a random solar system!
To meet how powerful Blender'southward Python API can be and how to use it, let'south work on a basic instance: instantiating a bunch of planets around a sun (all existence simple spheres) with random size, speed and color, and having the planets rotate around the lord's day along circular orbits.
Now, let's be clear: this willnon exist a concrete simulation. We will pick all of our values at random and there will be no logical human relationship any betwixt the distance to the lord's day, the radius and the surface colour of the planets. The goal here is just to play around with Blender'south Python API, to see how to do some procedural generation and to have fun with glowy spheres 😉
Pace 1: Preparing our Blender
First things first: let's see how to setup our Blender for Python and larn the unlike tools we have at our disposal.
Annotation: this tutorial uses screenshots from Blender 2.93. Likewise, I will be using the Python API from Blender ii.8+, and so make certain your version matches 🙂
When you desire to work with Python in Blender, something that is quite useful is tostart your Blender with the console fastened. This will let you to meet some logs if your Python script errors, which is pretty essential for proper debugging!
Basically, the idea is to launch Blender from your terminal rather than from your Application shortcut. The exact path to your Blender executable depends on your Os; I'm using Mac, so all I have to do is open a terminal and and so run something like this:
/Applications/Blender.app/Contents/MacOS/Blender &
From that signal on, whatever outputs my Python scripts give me will testify up in this panel 🙂
Now, to get gear up for coding, simply go to the "Scripting" tab at the top of your Blender's window:
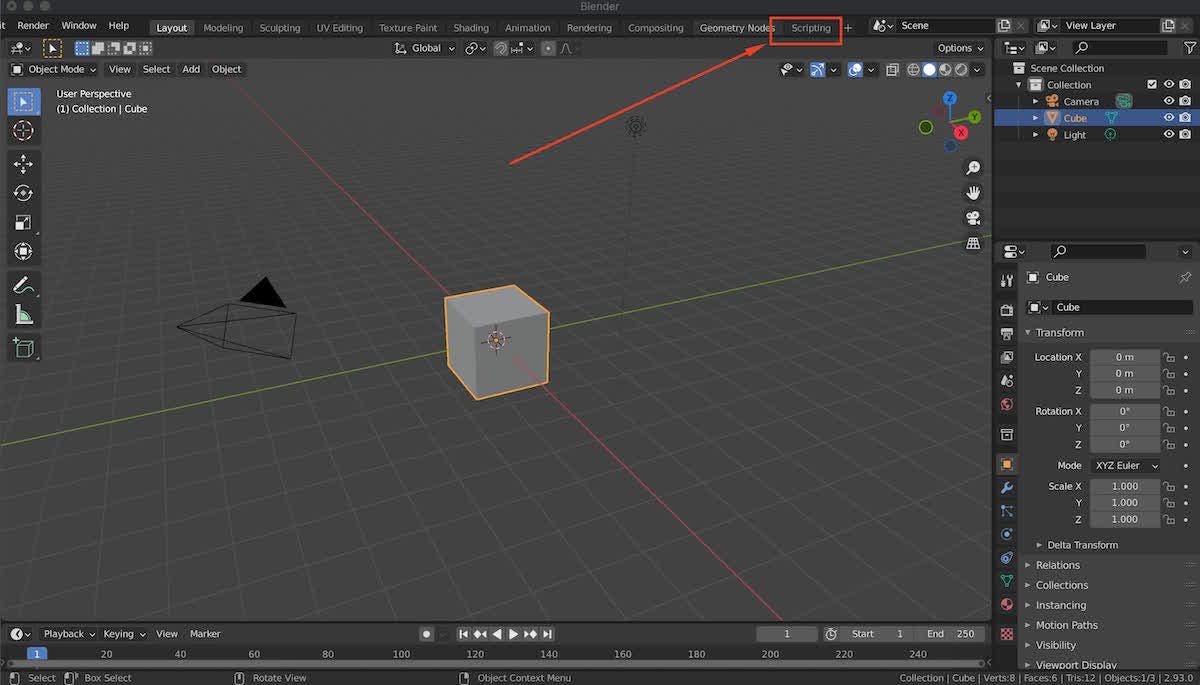
This will give a set of new panels in your workspace, namely:
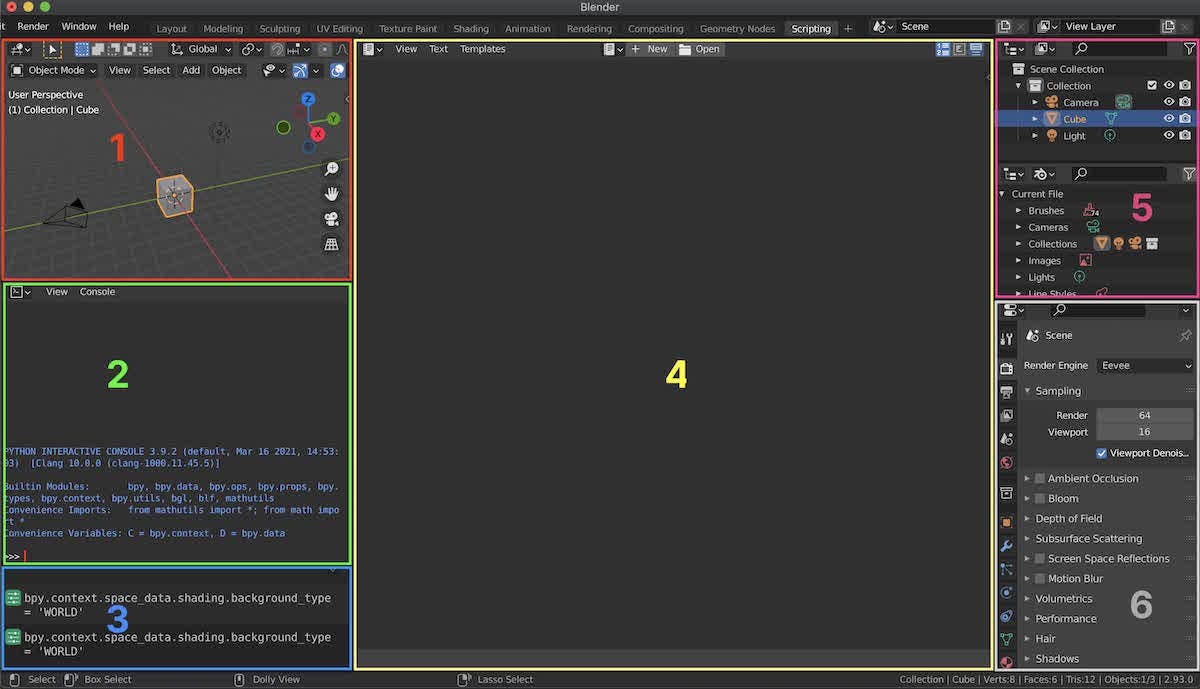
- the 3D view: it'south only similar you lot're usually getting started screen in Blender – you're seeing your current scene in 3D, in "solid" shade mode, and you tin can select your diverse objects every bit usual
- the Python interactive panel: that tailor-fabricated Python console is incredibly useful to browse the Blender API and explore all the fields and methods the Python Blender objects provide us with; in addition to the basic Python built-ins, this console besides comes loaded with Blender'south built-ins and a few convenience variables to easily access the Blender API common submodules
- theInfo panel: it might seem strange at starting time, but this panel only debugs everything y'all practice – which is yet once more great for discovering the possibilities of the API! If you try and select an object, or move your light, or any other action that you're used to doing in Blender, you'll come across information technology is logged in this console and and so you tin understand which office of the API y'all should access to reproduce this activeness via scripting
- theText Editor: you might accept guessed – it'due south the chief course for us today; this is where we'll create, edit, relieve and run our Python script. It is a simple Python editor with syntax highlighting, line numbers, and even a few utilities like "Find & Replace" if you open the sidebar (with <Ctrl + T>, or <Cmd + T> on Mac). Annotation nonetheless that this editor is express in terms of features and so if yous plan on making a big thing, it'southward probably better to utilise a nice external IDE and then load your script in Blender when it'south gear up
- theOutliner: that's another common view you likely already know that just shows the hierarchy of objects in your current scene and allows for quick access
- theProperties console: similarly, this panel is the same every bit in the common layouts – information technology's where you tin view and edit the backdrop of your scene, your render parameters, your globe settings and the specific data for your currently selected object
To cheque that everything is working, simply click on the "+ New" button of the Text Editor, write a basic impress('hello world') line in the Python script and click the "run" icon on the right (or apply the shortcut <Alt + P>; make sure your mouse is hovering the Text Editor panel for this to work).
If everything is setup properly, you lot should run into "hi world" announced in your attached terminal!
Step 2: Creating a basic mesh via the API
Alright! Time to get existent and instantiate some objects in our scene using Python 🙂
To begin with, delete all the initial objects: the cube, the camera and the light. We won't be using those.
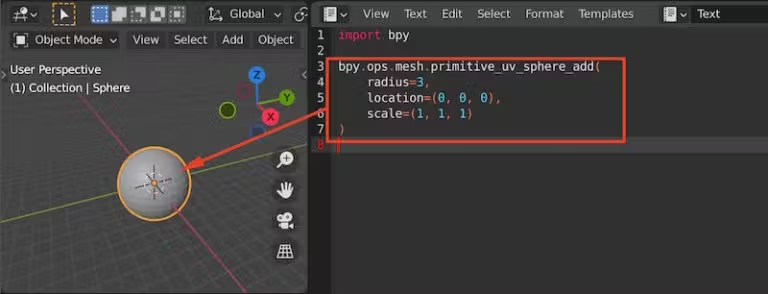
Now, let's edit our Python script to create a new sphere object. This is washed using the bpy.ops subpackage and more precisely the mesh.primitive_uv_sphere_add() method:
import bpy bpy.ops.mesh.primitive_uv_sphere_add( radius=3, location=(0, 0, 0), scale=(1, 1, 1) )
The parameters are pretty self-explanatory: we are creating a sphere with a radius of 3 at the origin point, with a normalised calibration. (Feel free to scan the docs for more than details on the available options)
In one case again, run your code by clicking the "run" icon or with the <Alt + P> shortcode. And tadaa! We've only created a elementary UV sphere in our 3D scene purely via scripting! 😉
Footstep 3: Instantiating our planets
We're now able to spawn one sphere – so let's run across how easy information technology is to spawn several!
What nosotros want to do is:
- to create N_PLANETS objects, each being a elementary UV sphere
- accept every object utilize a random radius within a given range
- and a random altitude from the origin (where we'll eventually place our sun) that depends on the index of the planet (and so that their orbits are nicely spread)
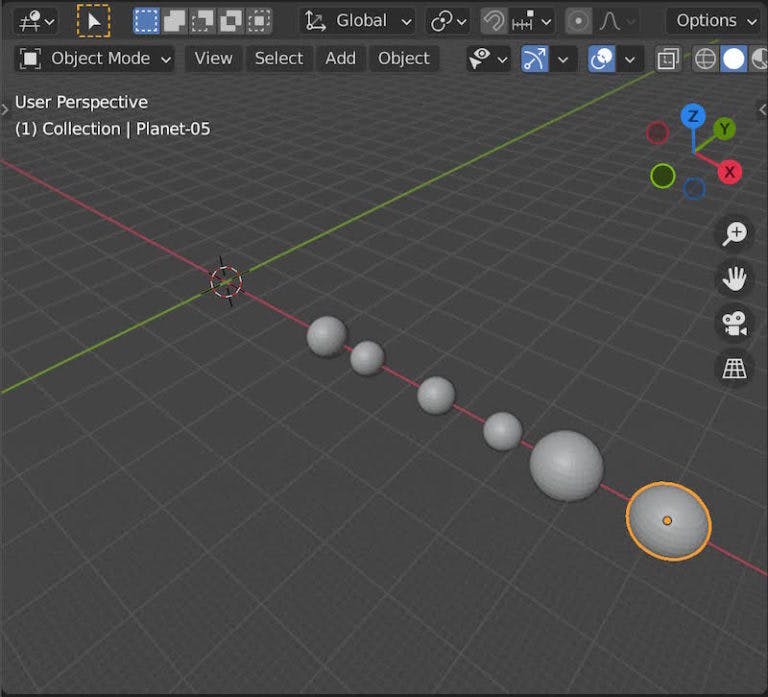
Making N_PLANETS instances is straight-forrad: we'll simply wrap our primitive_uv_sphere_add() phone call in a for-loop and run it multiple times. To keep the script readable, we'll actually extract this instantiation process into a util function, create_sphere(), and nosotros'll pass it in the random radius and distance.
To go a random value for our radius and our distance, we can rely on the Python congenital-in random module.
Likewise, we shouldproper name our objects properly: this is interesting to keep our hierarchy clear and it will be essential when, subsequently on, we automatically clean upward the scene upon script initialization. I'll simply telephone call each object "Planet-00", "Planet-01" and then on, for the N_PLANETS spheres.
Hither is the updated script:
from random import random import bpy def create_sphere(radius, distance_to_sun, obj_name): # instantiate a UV sphere with a given # radius, at a given distance from the # world origin betoken obj = bpy.ops.mesh.primitive_uv_sphere_add( radius=radius, location=(distance_to_sun, 0, 0), scale=(1, 1, 1) ) # rename the object bpy.context.object.name = obj_name # return the object reference return bpy.context.object N_PLANETS = vi for n in range(N_PLANETS): # get a random radius (a float in [1, 5]) r = 1 + random() * iv # get a random distace to the origin point: # - an initial offset of 30 to get out of the sunday's sphere # - a shift depending on the alphabetize of the planet # - a little "noise" with a random float d = 30 + n * 12 + (random() * 4 - 2) # instantiate the planet with these parameters # and a custom object name create_sphere(r, d, "Planet-{:02d}".format(n)) If yous run this over again, you should get a little prepare of well-aligned planets with various sizes that are all named in the right format:
Step 4: Adding the sun and the radius rings
In a similar manner, we can re-utilize ourcreate_sphere() method and make another one, calledcreate_torus(), to add a sphere for the sun and some torus objects to testify the planet orbits:
from random import random import bpy def create_sphere(radius, distance_to_sun, obj_name): # ... def create_torus(radius, obj_name): # (same as the create_sphere method) obj = bpy.ops.mesh.primitive_torus_add( location=(0, 0, 0), major_radius=radius, minor_radius=0.1, major_segments=60 ) bpy.context.object.proper noun = obj_name render bpy.context.object N_PLANETS = 6 for north in range(N_PLANETS): # ... # add together the radius ring display create_torus(d, "Radius-{:02d}".format(due north)) # add the sun sphere lord's day = create_sphere(12, 0, "Sun") The sunday is of form bigger than the planets, and the rings are just placed at the same fourth dimension equally the planet spheres, using the distance to the origin for the torusradiusparameter:
Pace v: Setting the materials and the shading for our objects
This is cracking, simply those objects are a fleck morose, all gray and blocky. It's time to work on two important 3D concepts:the shading and the materials of our objects!
More often than not speaking, theshading refers to how an object reacts to light and is fatigued in the 3D view or in a render. Here however, I'thou focusing on the"smooth" versus "apartment" shading, which determines howfaceted an object appears. It's basically a second layer that further impacts how the object is rendered, only doesn't alter its actual geometry: it merely looks smoother.
Setting the objects to apply the "smooth" shading is really quick to do: we have a dedicatedshade_smooth()method in thebpy.opssubmodule:
from random import random import bpy def create_sphere(radius, distance_to_sun, obj_name): # ... # employ shine shading bpy.ops.object.shade_smooth() # return the object reference return bpy.context.object def create_torus(radius, obj_name): # ... # utilize smooth shading bpy.ops.object.shade_smooth() # return the object reference return bpy.context.object # ...
The real question here is: how can we give somecolors to our planets, and how could we make our sundayglow?
The respond is: thank you tomaterials and shaders! 🙂
What are materials and shaders?
Both those terms tin can be used to talk virtually "the palette of backdrop that ascertain how an object gets rendered".
Roughly put,shaders are what give 3D objects their color, their shininess, their glossiness, their roughness… Think virtually information technology: in the real world, what makes you say that "hum, this is wood" is just a whole set of clues: the object is some tint of brown, it reflects light a scrap but non with abrupt light spots like metal, information technology doesn't refract rays like glass and it doesn't reflect your image like a mirror… Well – with the e'er-improving CGI technology, all of these properties tin can at present be modeled and reproduced in our 3D scenes!
Note: when you're really aiming for realistic renders, yous'll probably have to dive intophysical-based rendering or PBR. And that's what Blender'south Cycles engine is for creating amazingly lifelike pictures that just "experience" existent, mostly thanks to a bunch of circuitous and well-tweaked shaders.
In Blender, shaders are usually edited via the node-based graph editor (available in the "Shading" tab) that lets you lot chain and combine as many congenital-in nodes every bit you want to build more than or less complex shading flows. In this tutorial, however, we'll make a super simple shader that only has one node, then we'll exercise everything in our Python script 🙂
Materials then use those shaders and apply them to your 3D geometry. An object may have several fabric slots, i.due east. information technology can apply dissimilar shaders for different parts of the geometry, but we won't get into that today, and we'll stick with one material slot per object.
Picking our shader type
Ok, so – what shader should we create?
For this project,I'grand using the EEVEE engine that can too work with shader nodes, fifty-fifty though it doesn't have all the same node types every bit the Cycles engine.
Merely it's fine because, hither, what I want is one that exists in both: theEmission shader. You tin can moving picture it as a big lightbulb that has an intensity (the "forcefulness" parameter) and a color. It volition make your 3D object emit light (so your object will become a calorie-free source in your scene that we'll interact with the rest of the meshes!) and essentially make it "glow" 🙂
Creating a shader in our Python script
To create and assign a shader fully via scripting, we have to:
- create a new shader resources using thebpy.data submodule
- "edit" this shader as we would with the shader node editor: we'll remove some nodes, add others, set their properties and link them together
- retrieve the reference to our newly created fabric
- and finally, add it to the materials information (i.e. the slots) of our object
Let'south piece of work on this step by pace. We'll kickoff past making a new function calledcreate_emission_shader() that volition receive some strength and color parameters, and that volition utilise those to setup a basic two-nodes graph with an Emission node and an output node.
The idea is to start from the bones node template and clear all the starter nodes; then, we tin add together in our emission and output nodes, configure the emission node by updating the values of its input fields and create a link between the ii nodes:
def create_emission_shader(color, strength, mat_name): # create a new material resource (with its # associated shader) mat = bpy.data.materials.new(mat_name) # enable the node-graph edition mode mat.use_nodes = Truthful # articulate all starter nodes nodes = mat.node_tree.nodes nodes.clear() # add the Emission node node_emission = nodes.new(blazon="ShaderNodeEmission") # (input[0] is the color) node_emission.inputs[0].default_value = color # (input[1] is the force) node_emission.inputs[ane].default_value = forcefulness # add together the Output node node_output = nodes.new(type="ShaderNodeOutputMaterial") # link the two nodes links = mat.node_tree.links link = links.new(node_emission.outputs[0], node_output.inputs[0]) # render the material reference return mat
It's now pretty piece of cake to use this method to create our material resource and utilise them to our objects. We'll demand one white emissive material for the rings, one yellow emissive material for the sun and one emissive fabric per planet with random color (though I'll add together in more blueish for a improve overall color balance 😉 ):
# ... N_PLANETS = vi ring_mat = create_emission_shader( (one, one, 1, 1), 1, "RingMat" ) for northward in range(N_PLANETS): # ... planet = create_sphere(r, d, "Planet-{:02d}".format(n)) planet.data.materials.append( create_emission_shader( (random(), random(), 1, 1), 2, "PlanetMat-{:02d}".format(n) ) ) # add the radius ring display band = create_torus(d, "Radius-{:02d}".format(north)) ring.data.materials.append(ring_mat) # add together the sun sphere sun = create_sphere(12, 0, "Sun") sunday.information.materials.append( create_emission_shader( (1, 0.66, 0.08, one), 10, "SunMat" ) ) If you alter the shading way in your 3D view to "Rendered", you lot delete all the objects currently in the scene and yous run the script again, you lot'll see that they at present accept squeamish glowy materials on them!
Note that subsequently you've run the script, you can even go to the "Shading" tab, select an object with a shader and see the shader graph:

Information technology looks as expected: two nodes, one Emission and i Output, a link between the 2, and some custom values for the "Force" and "Colour" backdrop.
Annotation: when yous initially open up the console, nodes will be all packed together in the centre on top of each other. Hither, I moved the nodes manually for the demo but you tin actually exercise it in your lawmaking, too, with the .location property.
Step half-dozen: Animating the planets
We're getting shut to having our final "solar arrangement generator"! The concluding matter we need to take care of is animating the planets then that they rotate effectually the lord's day every bit fourth dimension passes past.
To do this, nosotros'll apply Blender'sblitheness curve system (the F-curves). It's a moreavant-garde version ofkeyframed animation where y'allspecify the central values for ane or more properties of your object over time (e.g. yous forcefulness its position, rotation, calibration… at a given frame) merely also theinterpolation between them.
Here is an example of the same set of key points with the three possible interpolations (from left to correct: constant, linear and bézier):

You see how the interpolation affects the intermediary car-computed values (all the segments in-between the keyframes that we defined manually) and how that impacts the overall development of this holding for the object. Suppose this line represents the altitude of a little helicopter:
- with abiding interpolation, the helicopter just keeps on diving up and downwardly, and so going straight alee with little plateaux
- with linear interpolation, the helicopter slides from one indicate to another with sweet diagonals, simply it still changes direction quite suddenly when it reaches extrema
- with bézier interpolation, the helicopter slows downwards before reaching those valleys and ridges and smoothly updates its course
The "best interpolation" depends on the type of animation you desire. In our case, nosotros should option the linear interpolation so that planets but movement at a regular step forth their orbits.
To create some animation for our planets, we just need to use the animation_data_create() method and the animation_data field of our objects to create and so edit the F-curve for the Z-rotation property. This property is actually part of a 3D-vector belongings of the object called the "Euler rotation" (more on Blender rotation modes hither) where the Z-centrality is the third component, i.e. the one at index ii (because the components are 0-indexed).
Once we've grabbed this property, we'll simply add together ii keyframes: one for thestart frame (with our current rotation of 0) and another for theend frame (with arandom rotation of one or more semi-circles around the sun, so that the planets acceptdifferent speeds). And we'll brand sure that those keyframes use a linear interpolation mode 😉
Note: all rotations must be written usingradians.
from math import pi # ... N_PLANETS = 6 START_FRAME = 1 END_FRAME = 200 for n in range(N_PLANETS): # ... # setup the planet animation data planet.animation_data_create() planet.animation_data.action = bpy.data.actions.new(name="RotationAction") fcurve = planet.animation_data.action.fcurves.new( data_path="rotation_euler", index=2 ) k1 = fcurve.keyframe_points.insert( frame=START_FRAME, value=0 ) k1.interpolation = "LINEAR" k2 = fcurve.keyframe_points.insert( frame=END_FRAME, value=(two + random() * 2) * pi ) k2.interpolation = "LINEAR"
If yous clean up your scene and re-run the script, you'll run across that… zilch happens! The planets aren't moving, even when you play the animations!
And that'due south considering, in truth, they are rotating… just not around the right pivot! For now, the planet are simply revolving, they are rotating effectually their local Z axis.
To fix this, we just demand to change the pin betoken of our objects and snap it dorsum to the cursor that is at the world origin point (the same location as our sun):
# ... for n in range(N_PLANETS): # ... # ready planet every bit active object bpy.context.view_layer.objects.active = planet planet.select_set(True) # gear up object origin at earth origin bpy.ops.object.origin_set(blazon="ORIGIN_CURSOR", eye="MEDIAN") # setup the planet blitheness data # ...
Now, if you hover the 3D view and hit the spacebar, time volition start flowing and the animations volition play, making our planets revolve around the sun! 🙂
Step vii (Bonus): Automobile-cleaning the scene on script init
After we've run our script, we take created two types ofresources in our scene: the 3D objects for the planets, the sun and the orbit rings; and the dynamic materials for the planets.
Getting rid of this is pretty simple: we simply need to use the bpy.data submodule to go through our objects and our materials, check for the names and remove the ones that we created while running the script:
# ... def delete_object(proper name): # effort to find the object past name if name in bpy.data.objects: # if it exists, select information technology and delete information technology obj = bpy.data.objects[proper name] obj.select_set(True) bpy.ops.object.delete(use_global=Simulated) N_PLANETS = 6 START_FRAME = ane END_FRAME = 200 # clean scene + planet materials delete_object("Sun") for n in range(N_PLANETS): delete_object("Planet-{:02d}".format(n)) delete_object("Radius-{:02d}".format(n)) for grand in bpy.data.materials: bpy.information.materials.remove(grand) # ... Now, y'all tin can run the script as many times as yous want: each time the scene volition offset becleaned up so that you become only ane instance of our "solar system" 🙂
Footstep viii (bonus): Car-setting the scene backdrop, the return engine and the 3D view settings
For nicer visuals, with a littlebloom effect, a dark background and no filigree or 10/Y-axis, you can even add the post-obit snippet at the beginning of your script to setup the scene with prissy settings:
# ... def find_3dview_space(): # find the 3D view panel and its screen space surface area = None for a in bpy.data.window_managers[0].windows[0].screen.areas: if a.type == "VIEW_3D": area = a break render area.spaces[0] if surface area else bpy.context.space_data def setup_scene(): # (set a black background) bpy.data.worlds["World"].node_tree.nodes["Background"].inputs[0].default_value = (0, 0, 0, 1) # (brand sure nosotros use the EEVEE return engine + enable blossom effect) scene = bpy.context.scene scene.render.engine = "BLENDER_EEVEE" scene.eevee.use_bloom = True # (prepare the animation offset/end/electric current frames) scene.frame_start = START_FRAME scene.frame_end = END_FRAME scene.frame_current = START_FRAME # get the current 3D view (among all visible windows # in the workspace) space = find_3dview_space() # apply a "rendered" shading mode + hide all # additional markers, grids, cursors... space.shading.blazon = 'RENDERED' space.overlay.show_floor = False space.overlay.show_axis_x = False infinite.overlay.show_axis_y = Simulated space.overlay.show_cursor = Fake infinite.overlay.show_object_origins = False N_PLANETS = 6 START_FRAME = 1 END_FRAME = 200 # setup scene settings setup_scene() # ... # deselect all objects bpy.ops.object.select_all(action='DESELECT')
Conclusion
Blender is non the merely 3D soft that allows you to program your scenes and automate tasks; just it is living up to the expectations and, with each new version, Blender is gradually becoming acredible all-in-i solution for CG product, from storyboarding with Grease Pencil to node-based compositing.
The fact that you tin can use Python scripts with merely a few additional packages to batch your object instantiation generate stuff procedurally, setup your render settings or even get custom stats on your current project is corking! To me, it'due south a way to lighten the load on tedious tasks but also to bring developers to the political party to extend this creative tool community beyond artists.
In this postal service, we've seen that with less than a hundred lines of Python, we tin create a bones procedural solar system with dynamic and randomized meshes, materials and animation!
I hope you've enjoyed this quick peek at Blender's Python API – and of course, feel free to comment and tell me if you have ideas of other squeamish visualizations we could create thank you to this tool! 🙂
Written by Mina Pecheux
Source: https://demando.se/blogg/post/dev-generating-a-procedural-solar-system-with-blenders-python-api/
Posted by: millersathimpiou.blogspot.com
0 Response to "How To Make An Object Extend In Animation In Blender"
Post a Comment